
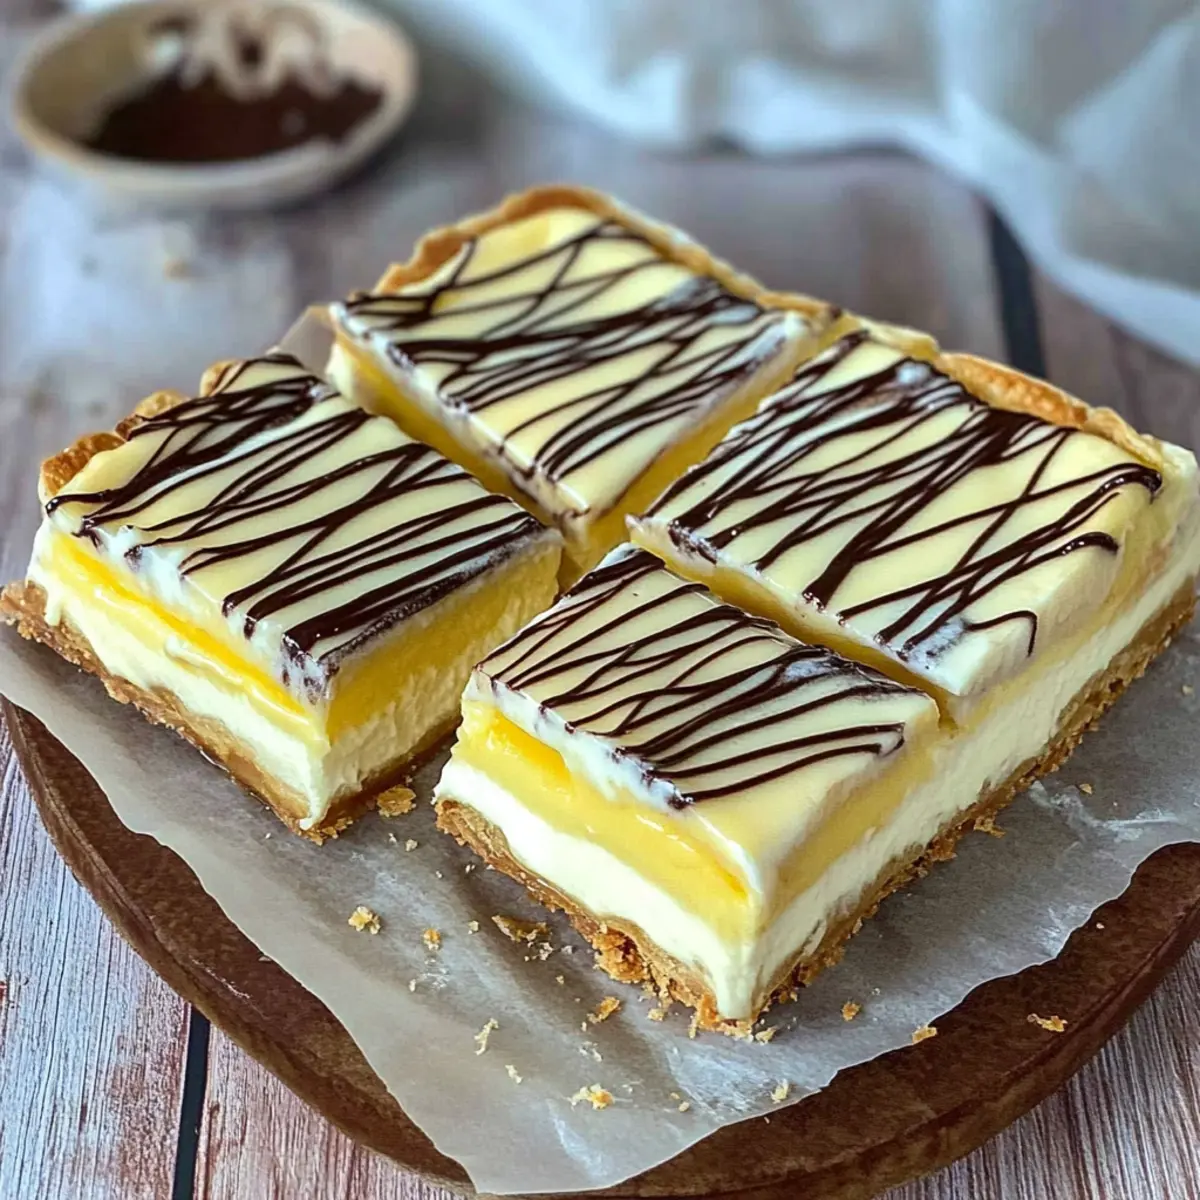
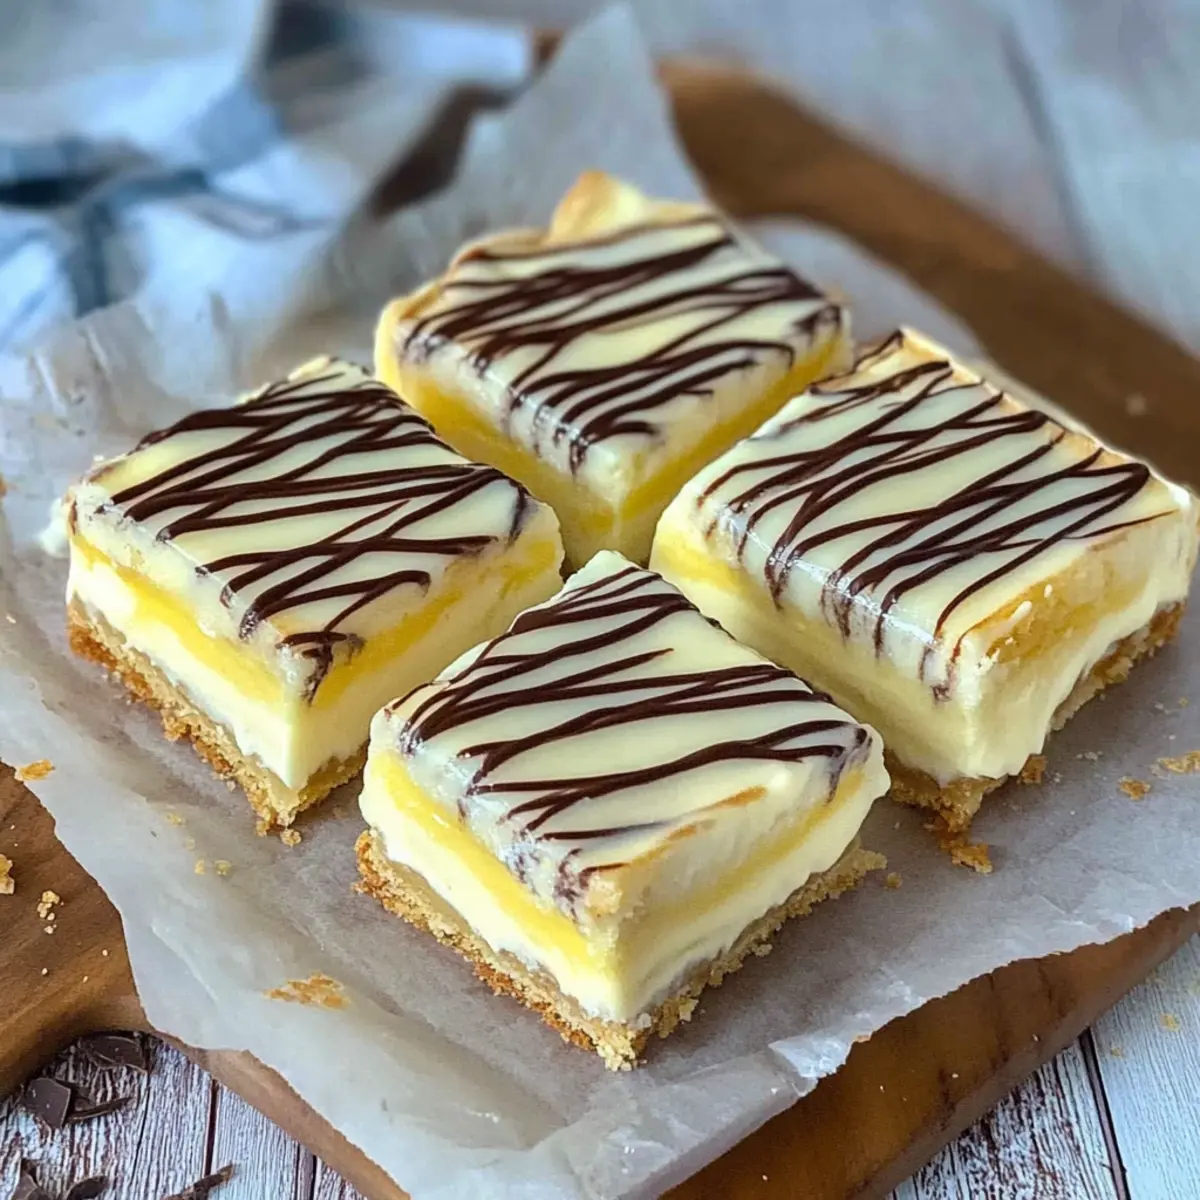
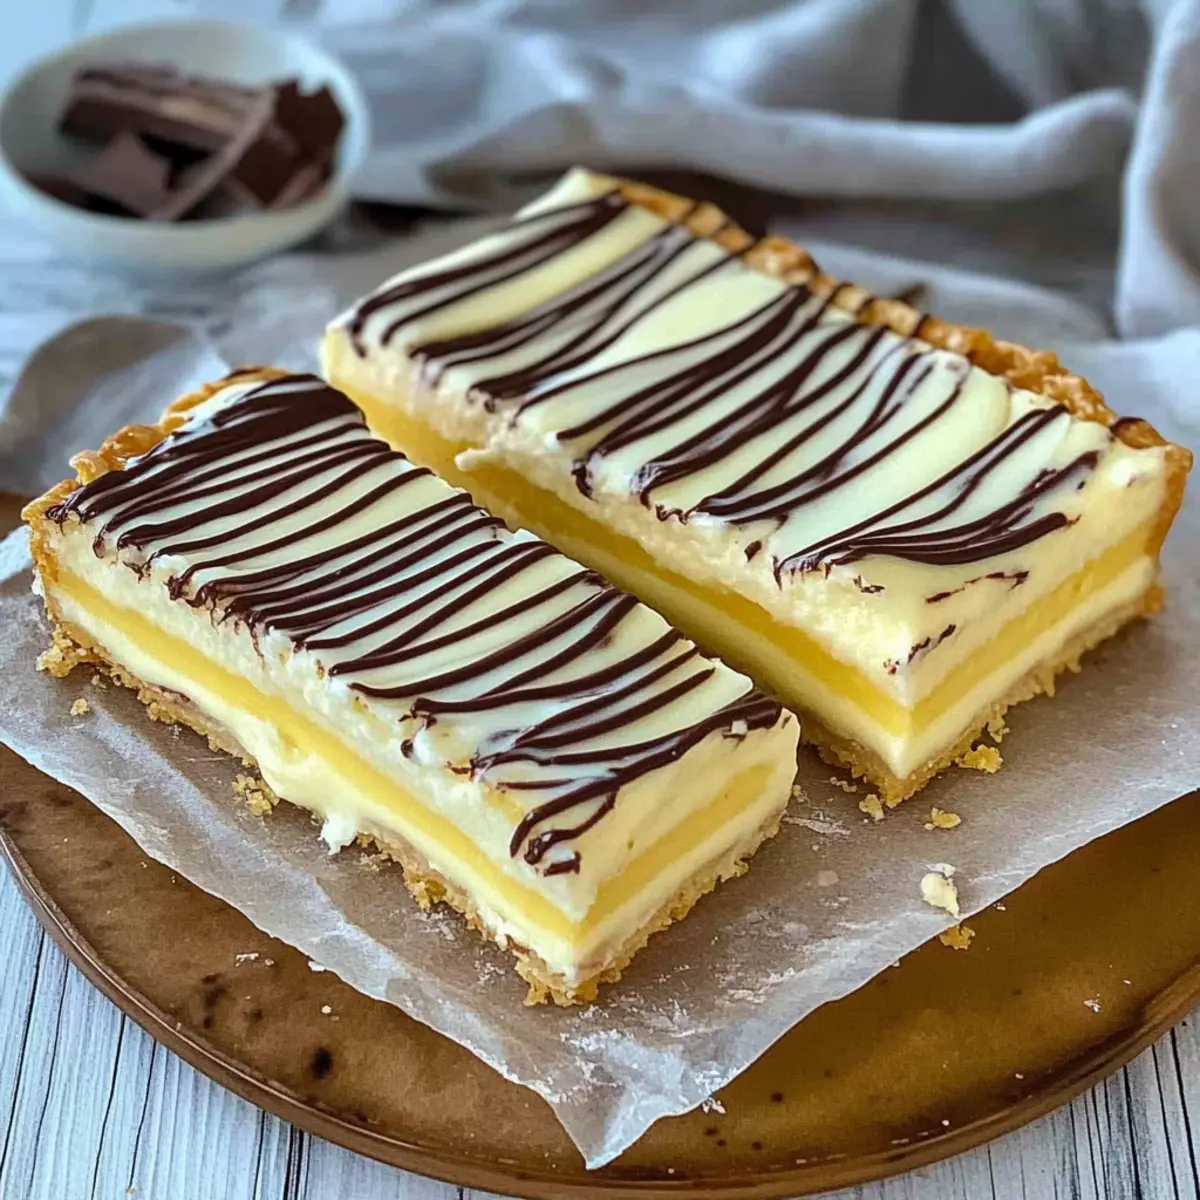
As I stood in the kitchen, the warm scent of vanilla filled the air, transporting me back to my childhood. This Nostalgic Custard Slice is more than just a recipe; it’s a delicious memory layered between flaky puff pastry, topped with a sweet icing and playful chocolate swirls. What I adore about this custard slice is its simplicity—it’s quick to prepare and is always a crowd-pleaser at gatherings. Not only does it bring a comforting sweetness that beckons everyone back for seconds, but it’s also a fantastic way to indulge a little without spending all day in the kitchen. Ready to whip up a slice that’s bound to impress? Let’s dive into this delightful journey and create a dessert that will have you reminiscing with every bite!
Why is this custard slice so irresistible?
Nostalgic flavor: This Custard Slice brings back childhood memories with its creamy filling and flaky pastry, making it an instant favorite for all ages.
Quick and Easy: With ready-made puff pastry, you can whip up this delicious dessert in no time, perfect for busy bakers.
Crowd-Pleasing Appeal: The combination of sweet icing and chocolate swirls suits any occasion, from family gatherings to potlucks.
Versatile: Customize this slice with different flavor extracts or jam layers, allowing you to make it uniquely yours! Whether you’re inspired by other treats like the delightful Brown Sugar Chai, or prefer this classic, there’s always a way to switch it up.
Satisfying Texture: The contrast of the creamy custard with the crispy pastry creates a delightful bite that keeps everyone coming back for more!
Custard Slice Ingredients
• For the Pastry
- Flaky Puff Pastry – Ready-made for quick assembly while providing a light, flaky texture that complements the creamy custard.
• For the Custard Filling
- Custard Powder – Gives the filling its rich and creamy consistency; be sure to choose a quality product for the best flavor.
- Sugar – Sweetens the custard and icing; adjust based on your taste preference and sweetness level desired.
- Milk – Use whole milk for a creamier custard; this is the base for creating that luscious filling.
- Egg – Essential for thickening the custard properly; substitutes may alter the texture dramatically.
- Vanilla Essence – Enhances the custard flavor and adds warmth; quality extract can elevate the dish.
• For the Icing
- Icing Sugar – Use confectioner’s sugar for a smooth and sweet topping that beautifully complements the custard.
- Butter – Incorporates richness into the icing; softening it beforehand makes mixing easier.
- Hot Water – Helps achieve the right consistency for spreading; add gradually to avoid runniness.
- Cocoa Powder – A hint of chocolate flavor; perfect for creating those delightful chocolate swirls over the icing.
Ready to mix and bake your very own Custard Slice? Let’s gather these ingredients and bring a piece of nostalgia straight to your kitchen!
Step‑by‑Step Instructions for Custard Slice
Step 1: Preheat and Prepare
Start by preheating your oven to 220°C (fan bake). While the oven warms up, grab a 21cm square tin and line it with baking paper—this prevents sticking and makes serving easier. This is the perfect time to prepare your flaky puff pastry, which will create a delightful base for your custard slice.
Step 2: Bake the Pastry Sheets
Take your puff pastry sheets and prick them thoroughly with a fork to prevent puffing up during baking. Place them in the preheated oven and bake for 8 minutes until lightly golden. After this initial bake, press the pastry down using a flat tray to ensure it stays flat and bake for another 8 minutes. Once done, allow the pastry to cool completely on a wire rack.
Step 3: Make the Custard Filling
While the pastry cools, prepare the custard filling. In a mixing bowl, combine custard powder, sugar, vanilla essence, and half of the milk, whisking until smooth. In another bowl, whisk the egg with the remaining milk. This two-step mixing is essential for the creamy texture of your custard slice, so ensure it’s well combined.
Step 4: Cook the Custard
In a saucepan, heat the remaining milk over medium heat until just boiling. Slowly pour in the custard mix while continuously stirring. Cook this mixture, stirring constantly, for about 5 minutes, or until the custard thickens to a creamy consistency. It should be thick enough to coat the back of a spoon, signaling it’s ready for the next step.
Step 5: Combine Ingredients
Remove the saucepan from the heat and gradually stir in the egg mixture and butter into the warm custard. This addition enriches your custard slice, enhancing its silky texture. Mix everything gently for about 2 minutes until the butter melts and the mixture is smooth. Set it aside to cool.
Step 6: Assemble the Custard Slice
Once the custard has cooled, fit one of the baked pastry sheets into the bottom of your lined tin. Carefully pour the cooled custard over the pastry, spreading it evenly. Gently place the second pastry sheet on top, pressing down lightly to secure the layers together. This layering method keeps your custard slice structurally sound.
Step 7: Prepare the Icing
For the icing, in a mixing bowl, combine icing sugar, softened butter, and a splash of hot water. Mix until smooth and creamy. It should be thick enough to spread but not runny. Set aside a small portion to mix with cocoa powder for that delightful chocolate swirl that finishes off your custard slice beautifully.
Step 8: Ice and Decorate
Spread the white icing evenly over the top of your assembled custard slice, ensuring it covers every corner. Take the colored cocoa icing and drizzle it over the top creatively. Use a skewer to make swirling patterns for that artistic touch. This step adds both visual appeal and flavor to your custard slice.
Step 9: Chill Before Serving
Once your custard slice is beautifully decorated, cover it with cling film and refrigerate for at least 5 hours, or preferably overnight. This chilling time allows the flavors to meld and the custard to set perfectly. When ready to serve, use a serrated knife to cut clean slices from your chilled dessert for an impressive presentation.

Make Ahead Options
These Custard Slices are perfect for busy bakers looking to save time during the week! You can prepare the flaky puff pastry and the custard filling up to 24 hours in advance. Simply bake the pastry sheets as directed, allow them to cool, then store them in an airtight container. The custard can also be made ahead; refrigerate it in a separate container to keep it fresh. When you’re ready to assemble, layer the cooled custard between the pastry sheets, ice, and decorate as desired. Allow the assembled slices to chill in the fridge for at least 5 hours (or overnight) for the best results. This approach maintains the creamy texture and delightful flavor of your Custard Slice, all while making weekday dessert prep a breeze!
Expert Tips for Perfect Custard Slice
- Knife Choice: Use a sharp serrated knife to cut the slice, ensuring clean edges and preserving the custard filling without squishing it.
- Pressing Pastry: If the pastry base puffs during baking, press it down gently with a flat tray to achieve an even surface, crucial for layering.
- Custard Consistency: Boil the custard thoroughly while stirring to reach the right thickness; this step is vital for a perfectly creamy texture.
- Warm Custard: Layer the custard while it’s still warm on the pastry; this helps it adhere better, preventing the layers from sliding apart.
- Chill Time: Be patient with chilling; letting the custard slice set overnight enhances flavors and makes slicing easier when serving.
What to Serve with Nostalgic Custard Slice with Chocolate Swirls
What pairs perfectly with the sweetness of this delightful custard slice?
This custard slice is ideal as a stand-alone dessert, but when plated with complimentary flavors, it transforms into a standout meal.
-
Fresh Berries: The vibrant tartness of strawberries or raspberries balances the creamy custard beautifully, adding a refreshing contrast.
-
Whipped Cream: Light and airy, a dollop provides a luxurious creaminess that enhances the dessert experience and complements its sweetness.
-
Chilled Fruit Salad: A mixture of seasonal fruits brings brightness and a natural sweetness that lightens the overall dish. The variety of flavors keeps each bite exciting!
-
Chocolate Sauce: Drizzling over the top creates an indulgent chocolatey touch that enhances the existing swirls, inviting every chocolate lover to dig in.
-
Mint Tea: Serve alongside a warm herbal mint tea to cleanse the palate, soothing the senses after a creamy and enriching dessert.
-
Espresso: The rich, bold flavors of a freshly brewed espresso contrast well with the sweet custard, creating a delightful after-dinner pairing.
-
Vanilla Ice Cream: The contrasting temperatures of the warm custard and cold ice cream offer a delightful experience with each bite, bringing a classic combination to life.
-
Almond Biscotti: Crisp texture and nutty notes in these dunking cookies provide a fun element to the dessert, perfect for crunch lovers!
-
Caramel Sauce: A drizzle of warm caramel introduces an additional layer of sweetness while giving a sticky, decadent finish.
Feel free to mix and match, as every addition brings a new dimension to the nostalgic custard slice experience!
How to Store and Freeze Custard Slice
Fridge: Store your custard slice in an airtight container for up to 5 days. This keeps the pastry flaky and the custard creamy for your next delightful treat.
Freezer: For longer storage, freeze the uniced custard slice for up to 2 months. Wrap it well in plastic wrap to prevent freezer burn, and icing can be added after thawing.
Reheating: Thaw the frozen custard slice in the fridge overnight before serving. If you prefer a warm treat, you can lightly toast it in the oven at 150°C (300°F) for 10–15 minutes.
Serving Tips: After refrigeration, always slice it cold with a sharp serrated knife for the best presentation and to maintain the custard texture!
Custard Slice Variations & Substitutions
Customize your custard slice adventure with these delightful twists that play with flavor and texture!
-
Flavor Extracts: Swap vanilla essence for almond or lemon extracts to create a unique taste sensation. Both options add a fresh, zingy twist to the classic custard.
-
Fruity Layers: For a fruity delight, spread a layer of your favorite jam, like raspberry or apricot, beneath the custard filling. This adds a delicious contrast to the creamy layer for a burst of flavor.
-
Graham Cracker Crust: Replace puff pastry with a graham cracker crust for a no-bake twist. This will give you a delightful crunch while maintaining that wonderful custard layer.
-
Chocolate Custard: Mix cocoa powder directly into the custard mixture for a decadent chocolate version of the classic. Chocolate lovers will adore this variation, especially with extra chocolate icing.
-
Dairy-Free: Substitute whole milk with almond, soy, or oat milk to create a dairy-free version of this custard slice. Ensure you use a dairy-free butter for the icing as well.
-
Coconut Twist: Incorporate shredded coconut into the custard for an exotic feel. This adds wonderful texture and flavor that transports you to a tropical paradise.
-
Spicy Kick: A pinch of cinnamon or nutmeg can be added to the custard for subtle warmth. This is a lovely way to elevate the flavors and add a depth of warmth.
-
Nutty Addition: Fold in finely chopped nuts like hazelnuts or almonds into the custard before layering. This adds a delightful crunch and enhances the nutty flavor throughout.
Remember, you can always get inspiration from other delicious desserts, like the warm and inviting Brown Sugar Chai, that might inspire a festive twist on this nostalgic custard slice!
Custard Slice Recipe FAQs
What type of puff pastry should I use?
I recommend using ready-made flaky puff pastry for this Custard Slice; it saves time and provides that delightful light and flaky texture. If you want a completely homemade experience, you can try making your own puff pastry, but it will definitely require more time and effort!
How should I store my custard slice?
Store your custard slice in an airtight container in the refrigerator for up to 5 days. This keeps the pastry from becoming soggy while maintaining the creamy custard filling. Make sure to keep it chilled, as room temperature can lead to a compromised texture.
Can I freeze the custard slice?
Absolutely! You can freeze the uniced custard slice for up to 2 months. Wrap it tightly in plastic wrap to prevent freezer burn. It’s best to wait on the icing until after you’ve thawed it, which you can do overnight in the fridge before serving.
What do I do if my custard doesn’t thicken?
If your custard doesn’t thicken, don’t worry! First, ensure you’re cooking the mixture while stirring continuously—this helps activate the custard powder properly. If it still doesn’t reach the desired thickness, you can simmer it gently for a few more minutes until it coats the back of a spoon. The boiling process is essential, so keep an eye on it!
Can I use almond milk instead of regular milk?
While I typically recommend whole milk for a richer custard, you can substitute almond milk if you prefer a dairy-free option. Just keep in mind that the flavor and texture may be slightly different. For the creamiest results, consider adding a bit of cornstarch to help thicken the custard.
Is this recipe suitable for people with egg allergies?
Since eggs are key for thickening the custard, substituting them entirely may alter the texture significantly. However, you can try using a commercial egg replacer or a mixture of ground flaxseed with water as a substitute. Mix one tablespoon of ground flaxseed with two tablespoons of water and let it sit until it thickens, mimicking an egg’s binding properties.
Creamy Custard Slice with Chocolate Swirls to Delight You
Ingredients
Equipment
Method
- Preheat your oven to 220°C (fan bake) and line a 21cm square tin with baking paper.
- Prick the puff pastry sheets with a fork, bake for 8 minutes, press down, and bake for another 8 minutes.
- Mix custard powder, sugar, vanilla essence, and half of the milk until smooth. In another bowl, whisk the egg with the remaining milk.
- Heat the remaining milk until boiling, then slowly add the custard mix while stirring constantly until thickened.
- Stir in the egg mixture and softened butter into the custard, mixing gently until smooth.
- Layer one baked pastry sheet in the tin, pour custard over it, and top with the second pastry sheet, pressing down gently.
- Combine icing sugar, softened butter, and hot water to make icing; set aside some for cocoa mix.
- Spread the white icing over the custard slice, drizzle cocoa icing for decoration, and use a skewer to swirl.
- Cover and refrigerate for at least 5 hours or overnight before serving. Cut with a serrated knife.
Leave a Reply