
There’s nothing quite like the delightful aroma of peppermint wafting through the kitchen, especially during the holidays. As I mixed together the heavenly ingredients for these Easy Christmas Peppermint Creams, I couldn’t help but feel the festive spirit come alive. Each creamy bite coated in rich dark chocolate creates that perfect balance of flavor and texture, making this treat an instant favorite for gatherings or cozy nights at home. What I love most about this recipe is how quick and easy it is, allowing you to whip up a batch without the holiday stress. Plus, they’re perfect for sharing—or enjoying all by yourself, of course! Curious about how this simple recipe can sweeten your holiday season? Let’s dive in!

Why are Christmas Peppermint Creams so special?
Simplicity at its finest: This recipe requires minimal effort, making it perfect for both seasoned bakers and novices alike.
Creamy, dreamy texture: The luscious filling is a delightful blend of condensed milk and peppermint, providing a melt-in-your-mouth experience.
Crowd-pleaser: These treats are a guaranteed hit at holiday parties, impressing friends and family with their festive flair.
Versatility: Feel free to swap ingredients, using dairy-free condensed milk or varying chocolate types to customize your peppermint creams.
Make-ahead magic: Prep these delectable bites a few days in advance, saving you precious time during the busy holiday season.
Embrace the magic of the holidays with these festive delights, perfect for enjoying alongside your favorite hot cocoa or as a delightful after-dinner treat!
Christmas Peppermint Creams Ingredients
• Perfectly sweet and festive!
-
For the Cream Filling
-
Icing Sugar – Provides sweetness and structure for the peppermint creams; no substitutions recommended.
-
Condensed Milk – Brings creaminess and moisture to the filling; can use dairy-free condensed milk for a vegan option.
-
Peppermint Flavoring – Delivers that signature minty taste; can substitute with mint extract if needed.
-
Water – Helps achieve the desired consistency in the mixture; adjust as necessary based on paste texture.
-
For the Chocolate Coating
-
Dark Chocolate – Creates a rich, delectable coating for the creams; feel free to use milk chocolate or white chocolate variations.
Indulge in the joy of making these Christmas Peppermint Creams, with their creamy lusciousness inviting you to take just one more bite!
Step‑by‑Step Instructions for Easy Christmas Peppermint Creams
Step 1: Mix the Cream Filling
In a large mixing bowl, combine icing sugar, condensed milk, peppermint flavoring, and 2 tablespoons of water. Stir everything together until a stiff paste forms, requiring about 2–3 minutes of mixing. If your mixture feels too dry, add a teaspoon of water until the right consistency is achieved; it should be firm yet pliable for rolling.
Step 2: Roll Out the Paste
Dust a clean work surface generously with icing sugar to prevent sticking. Transfer the peppermint paste onto the surface and roll it out to a thickness of about 0.5 cm using a rolling pin. This should take around 2–3 minutes. Once rolled, ensure the paste is uniform and smooth; this will help with cutting even rounds for your Christmas Peppermint Creams.
Step 3: Cut the Rounds
Using a 4 cm cutter dusted with icing sugar, stamp out 24 rounds from the rolled paste. Ensure even pressure while cutting to achieve clean edges. As you cut, place the circles on a parchment-lined tray, leaving slight space between them. Allow them to dry at room temperature for about 30 minutes to firm up slightly, enhancing the coating’s adherence later on.
Step 4: Melt the Chocolate
In a heat-proof bowl, melt dark chocolate by placing it over a pot of simmering water, ensuring the base doesn’t touch the water. Stir continuously until the chocolate is completely smooth and melted, about 5–7 minutes. Remove from heat and let it cool slightly, but not harden, as you want a warm pouring consistency for decorating your peppermint rounds.
Step 5: Decorate the Rounds
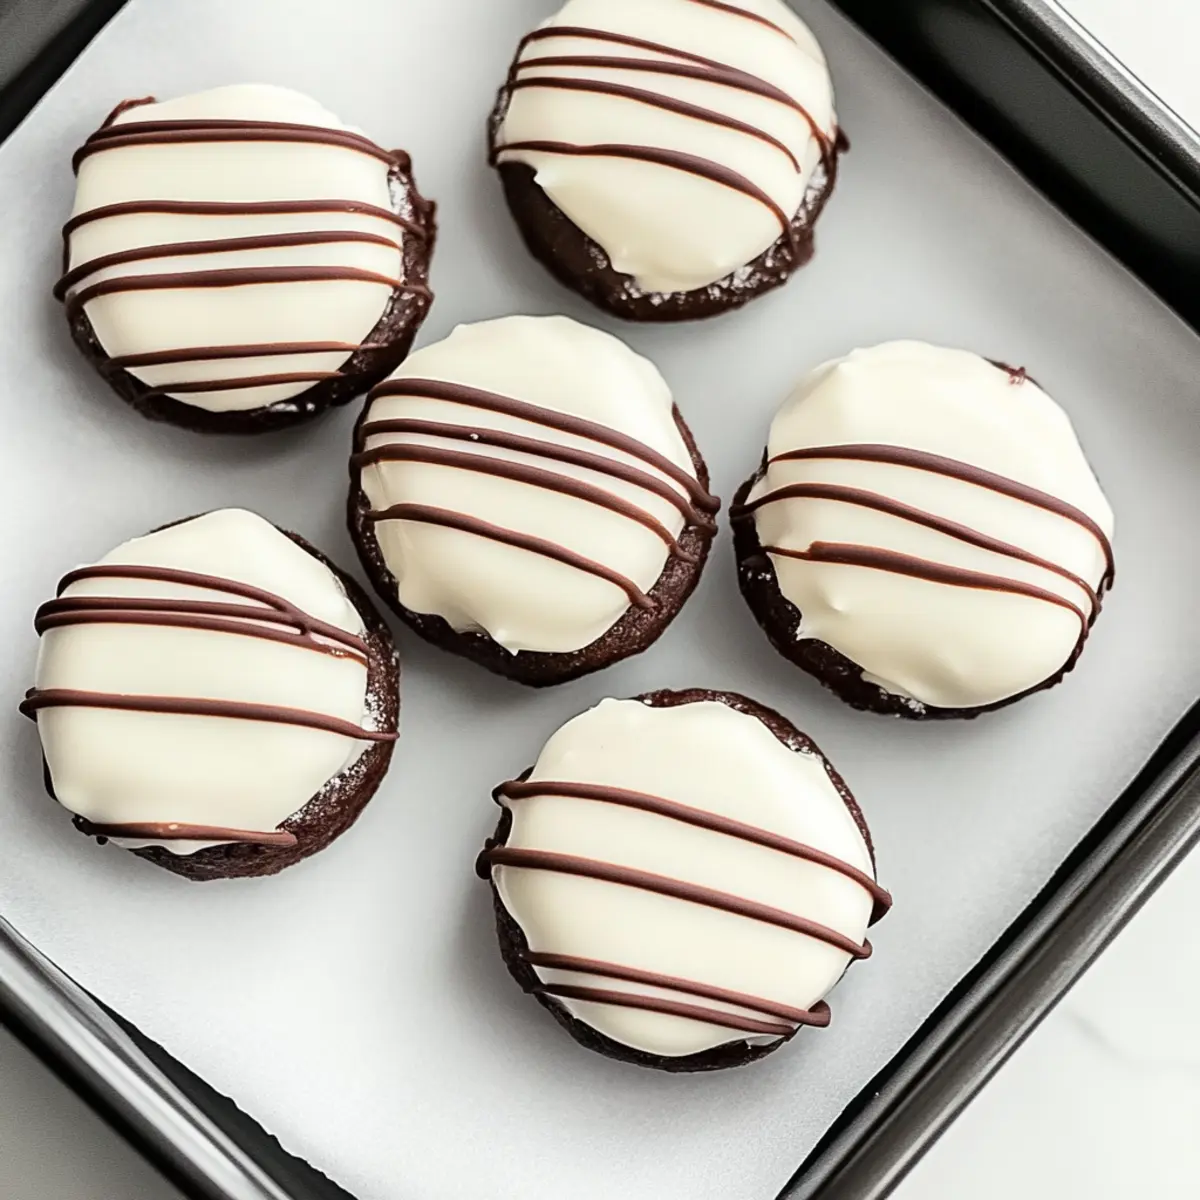
Transfer the melted chocolate into a piping bag for easy application. Drizzle the chocolate in a zig-zag pattern over each peppermint round, ensuring a pretty and festive look. This step usually takes about 10 minutes, making it a fun way to personalize your Christmas Peppermint Creams with a delightful chocolatey finish.
Step 6: Set the Chocolates
Once adorned with chocolate, place the decorated peppermint rounds into the refrigerator. Allow them to set for approximately 10 minutes, during which the chocolate will harden, sealing in the creamy filling beautifully. After the setting period, you’ll have perfect bites ready to serve or store, showcasing your amazing holiday treat skills!

What to Serve with Easy Christmas Peppermint Creams
The holidays are a time for gathering and indulging, so why not elevate your festivities with delightful pairings that enhance the joy of these peppermint treats?
-
Rich Hot Cocoa: The creamy chocolatey warmth beautifully contrasts the cool mint, creating an indulgent moment of bliss.
-
Espresso Shots: The robust flavor of espresso cuts through the sweetness, making each bite of peppermint cream even more enjoyable. Perfect for a post-dinner pleasure!
-
Gingerbread Cookies: These spiced delights add a festive crunch that complements the creamy texture of the peppermint creams, creating a holiday harmony.
-
Cranberry Sparkler: A tart, bubbly drink infused with cranberry juice provides a refreshing zing that brightens up your dessert table.
-
Chocolate-Covered Pretzels: The sweet-savory crunch of pretzels provides a delightful contrast to the smooth peppermint center, adding fun texture.
A holiday spread featuring these accompaniments will not only showcase your Easy Christmas Peppermint Creams but also create memorable moments filled with joy and delicious flavors!
Make Ahead Options
These Easy Christmas Peppermint Creams are perfect for busy home cooks looking to save time during the festive season! You can prepare the peppermint filling and cut the rounds up to 3 days in advance. Simply mix the icing sugar, condensed milk, peppermint flavoring, and water to form your paste, then shape and place them on a parchment-lined tray, allowing them to dry slightly. To maintain their melt-in-your-mouth quality, store them in an airtight container in the refrigerator until ready to decorate. When you’re ready to impress your guests, simply melt the chocolate, drizzle it over the rounds, and let them set for about 10 minutes. Enjoy the convenience of having these delightful treats ready for any holiday gathering!
Expert Tips for Christmas Peppermint Creams
-
Texture Control: If your peppermint paste is too dry, gradually add water until it reaches a pliable consistency for easy rolling.
-
Chocolate Melting: To avoid clumping, melt dark chocolate slowly over simmering water and stir continuously for a silky-smooth coating on your peppermint creams.
-
Drying Time: Allow your peppermint rounds to dry adequately at room temperature; this is key for achieving a clean chocolate coating.
-
Personal Touch: Get creative by using flavored extracts in place of peppermint for a unique twist on your Christmas Peppermint Creams.
-
Storage Tips: Keep your peppermint creams in an airtight container in the refrigerator to maintain their freshness for up to two weeks.
How to Store and Freeze Christmas Peppermint Creams
Airtight Container: Store your Christmas Peppermint Creams in an airtight container in the refrigerator for optimal freshness, where they will last for up to 2 weeks.
Freezing: For longer storage, freeze the peppermint creams by placing them in a single layer on a baking sheet first to firm up, then transfer them to an airtight container. They can be frozen for up to 3 months.
Reheating: For the best texture, let the frozen creams thaw in the refrigerator overnight before serving. No reheating is necessary; they’re delightful served cold!
Gift-Ready Treats: Wrap the peppermint creams individually in decorative foil or wax paper before freezing to make delightful, homemade gifts that friends and family will cherish!
Christmas Peppermint Creams Variations & Substitutions
Feel free to let your creativity shine by customizing these delightful treats to suit your tastes and dietary needs!
-
Dairy-Free: Swap regular condensed milk for a dairy-free version to enjoy these treats without compromising creaminess.
-
Mint Alternative: Use mint extract instead of peppermint flavoring for a refreshing twist; it’s just as fragrant and lovely!
-
Chocolate Choices: Experiment with white chocolate or milk chocolate for coating, allowing you to alter the sweetness and richness.
-
Flavor Infusions: Add a splash of orange or almond extract to the cream filling for a unique flavor that’s equally festive.
-
Texture Variety: For an added crunch, mix in some finely chopped nuts or crispy rice into the filling before rolling; the texture will be extraordinary.
-
Decorative Toppings: Elevate your presentation with sprinkles or crushed candy canes sprinkled on top before the chocolate hardens.
-
Spicy Kick: Want some heat? Incorporate a pinch of cinnamon or cayenne pepper into the cream mixture for a surprising spicy contrast.
-
Satisfyingly Smaller: Roll smaller-sized rounds for petite treats that are perfect for snacking or as part of a holiday dessert platter.
With all these yummy options, your Christmas Peppermint Creams can reflect your personal touch or adapt to suit your guests’ preferences, ensuring everyone leaves with a smile!

Easy Christmas Peppermint Creams Recipe FAQs
How do I choose the right peppermint flavoring?
Absolutely! For the best results in your Christmas Peppermint Creams, use high-quality peppermint flavoring to achieve that refreshing minty taste. If you’re out of peppermint flavoring, mint extract works as a suitable substitute. Sealing in that festive aroma is key to capturing the holiday spirit!
How should I store my Christmas Peppermint Creams?
To keep your peppermint creams fresh and delightful, store them in an airtight container in the refrigerator. They’ll maintain their scrumptiousness for up to 2 weeks. Make sure to separate layers with wax paper to prevent sticking!
Can I freeze Christmas Peppermint Creams?
Yes, definitely! To freeze your Christmas Peppermint Creams, first place them in a single layer on a baking sheet and allow them to firm up in the freezer for about 1 hour. Once set, transfer them into an airtight container, where they can remain frozen for up to 3 months. To serve, simply thaw them in the refrigerator overnight—no need to reheat!
What if my peppermint paste is too runny or dry?
Great question! If you find your peppermint paste too dry, gradually add more water, one teaspoon at a time, until it reaches a stiff yet pliable consistency. Conversely, if it’s too runny, sprinkle in extra icing sugar a tablespoon at a time until it firms up. This step is essential for cutting out perfect rounds!
Are Christmas Peppermint Creams safe for pets or those with allergies?
Very! It’s best to keep Christmas Peppermint Creams away from pets, as chocolate can be toxic to them. For those with allergies, especially to dairy, you can use dairy-free condensed milk to make a vegan-friendly version. Be mindful of potential sugar sensitivities as well, and always consider checking ingredient labels for allergens.
Creamy Christmas Peppermint Creams for Festive Indulgence
Ingredients
Equipment
Method
- In a large mixing bowl, combine icing sugar, condensed milk, peppermint flavoring, and 2 tablespoons of water. Stir until a stiff paste forms, about 2–3 minutes of mixing.
- Dust a clean work surface with icing sugar and roll out the peppermint paste to a thickness of about 0.5 cm using a rolling pin, which takes around 2–3 minutes.
- Using a 4 cm cutter dusted with icing sugar, stamp out 24 rounds from the rolled paste and place on a parchment-lined tray. Let them dry for about 30 minutes.
- Melt dark chocolate in a heat-proof bowl over simmering water, stirring continuously for 5–7 minutes until smooth. Let it cool slightly.
- Transfer the melted chocolate into a piping bag and drizzle over each peppermint round in a zig-zag pattern.
- Place the decorated rounds into the refrigerator for about 10 minutes to set the chocolate.
Leave a Reply