
As the holiday season approaches, I find myself immersed in a whirlwind of flavors and colors, reminiscent of the magic of childhood celebrations. Among the joy of baking, Red Velvet Snowballs emerge as a standout treat that never fails to enchant friends and family. With their festive, rich red hue and soft, chewy texture, these delightful cookies look great on any holiday cookie platter. Plus, they come together quickly, making them a perfect choice for last-minute gifts or festive gatherings. Whether you’re stacking them in a cookie jar or sharing them at a holiday party, the snowy coating of powdered sugar adds a cheerful touch to any occasion. Ready to dive into the world of holiday baking? Let’s create these whimsical little wonders together!

Why are these cookies holiday must-haves?
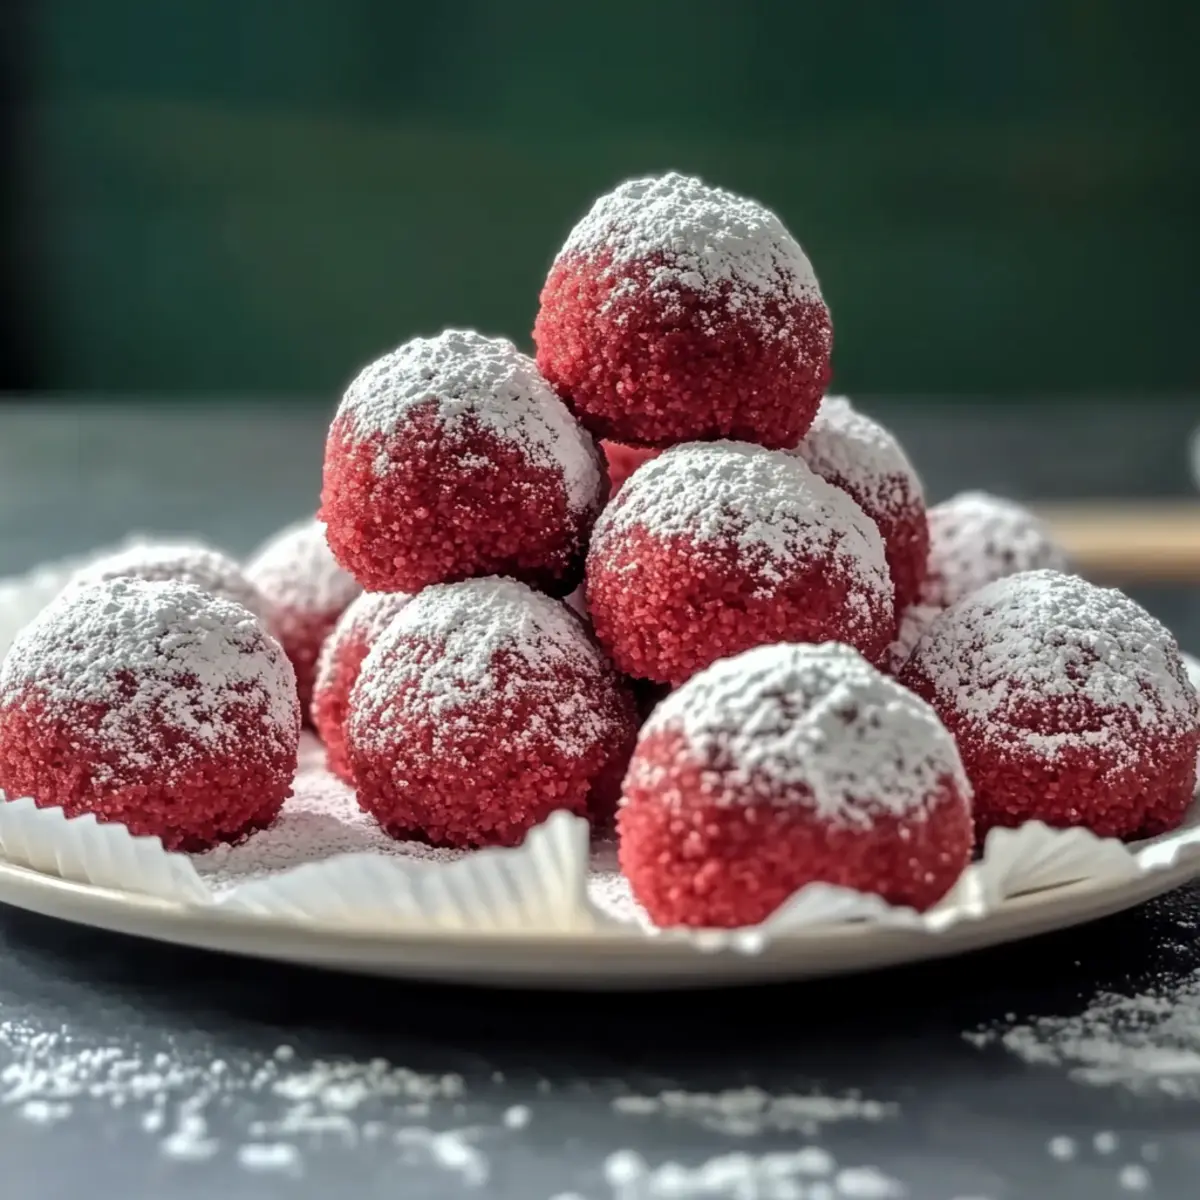
Festive Aesthetic: The vibrant red color and snowy coating make Red Velvet Snowballs a visual delight, adding a cheerful vibe to your holiday spread.
Quick and Easy: With minimal steps and common ingredients, they are a breeze to whip up, perfect for impromptu holiday baking sessions.
Crowd-Pleasing Flavor: The blend of chocolate and vanilla creates a rich, unique flavor that everyone loves—great for cookie exchanges!
Versatile Fillings: Customize your snowballs with delicious fillings like cream cheese or Nutella for a personal touch that surprises your guests.
Gift-Worthy: Pack them into festive tins for thoughtful, homemade gifts that show you care. Get ready to impress your friends and family this holiday season! For more festive baking ideas, check out these delightful Spooky Black Velvet treats and 4-Ingredient Gluten Free delights.
Red Velvet Snowballs Ingredients
• Get ready to create these festive holiday treats!
For the Cookie Base
- Butter – Softened butter ensures a rich and tender texture.
- Sugar – Adds sweetness and contributes to a light, airy cookie.
- Vanilla Extract – Offers a warm flavor that enhances the overall taste.
- Red Food Coloring – Use gel coloring for vibrant, eye-catching red cookies.
- All-Purpose Flour – Acts as the main structural component for these cookies.
- Cocoa Powder – Unsweetened cocoa provides chocolate richness and color.
- Baking Powder – Helps cookies rise slightly, creating a soft texture.
- Salt – Balances sweetness and enhances the overall flavor.
For the Snowy Finish
- Powdered Sugar – Rolling the cookies in this after baking gives them a beautiful snowy appearance, adding to the festive feel of the Red Velvet Snowballs.
Step‑by‑Step Instructions for Red Velvet Snowballs
Step 1: Prep Base
In a large mixing bowl, cream together 1 cup of softened butter and 1 ½ cups of sugar using an electric mixer on medium speed for about 3-5 minutes until light and fluffy. Next, mix in 1 teaspoon of vanilla extract and 2 tablespoons of gel red food coloring, blending until you achieve a vibrant red hue that excites the eyes.
Step 2: Mix Dry Ingredients
In a separate bowl, whisk together 2 ½ cups of all-purpose flour, ¼ cup of unsweetened cocoa powder, 1 teaspoon of baking powder, and ½ teaspoon of salt. This dry mixture provides structure and flavor; blend well until everything is evenly distributed, and set aside to prepare for the next mixing stage.
Step 3: Combine
Gradually add the dry ingredients to the creamed mixture, mixing on low speed to avoid unnecessary splatter. Continue until a soft, cohesive dough forms—this should take about 2-3 minutes. The dough should be slightly sticky but manageable, rich in color and ready for the next step in making your Red Velvet Snowballs.
Step 4: Shape Cookies
Preheat your oven to 350°F (175°C) and line a baking sheet with parchment paper. Using your hands, roll the dough into 1-inch balls, placing them evenly spaced on the prepared baking sheet. This allows room for them to spread slightly while baking, ensuring a lovely shape once cooked.
Step 5: Bake
Place the baking sheet in the preheated oven and bake the Red Velvet Snowballs for about 10-12 minutes. Watch closely; they should be set but remain soft in the center. The edges will appear firm, while the glossy tops will give a shiny finish that hints at their chewy texture.
Step 6: Finish with Sugar
Once baked, remove the cookies from the oven and allow them to cool on the baking sheet for about 5 minutes. While still warm, roll each cookie in powdered sugar twice, ensuring a snowy coat that adds a festive touch. Let them cool completely on a wire rack before serving or storing.

Make Ahead Options
These Red Velvet Snowballs are a fantastic choice for meal prep, allowing you to savor holiday baking without the last-minute rush! You can prepare the cookie dough up to 48 hours in advance by wrapping it tightly in plastic wrap and refrigerating it. Alternatively, for longer storage, shape the dough into balls and freeze them for up to 3 months; just remember to freeze without powdered sugar to maintain that snowy finish. When you’re ready to bake, simply place the frozen balls directly onto a baking sheet and add a minute or two to the baking time. This way, you’ll enjoy fresh, fluffy Red Velvet Snowballs that taste just as delicious as if you made them that same day!
Storage Tips for Red Velvet Snowballs
Room Temperature: Store cookies in an airtight container at room temperature for up to 5 days to maintain their chewiness and flavor.
Fridge: If you prefer a firmer texture, refrigerate the cookies; they will stay fresh for about a week in an airtight container.
Freezer: For longer storage, freeze unbaked dough balls for up to 3 months. Thaw in the fridge overnight before baking, then roll in powdered sugar after thawing for a snowy finish.
Reheating: If stored in the fridge, gently warm cookies in the microwave for 10-15 seconds to bring back their softness. Enjoy your delicious Red Velvet Snowballs!
Red Velvet Snowballs Variations
Feel free to personalize these delightful holiday treats for a unique twist every time you bake!
-
Creamy Filling: Add a dollop of cream cheese or chocolate ganache inside for a gooey surprise with each bite. Imagine the rich, creamy taste melting against the soft cookie texture—pure bliss!
-
Nutty Crunch: Mix in chopped pecans or walnuts into the dough for an exciting contrast of flavors and textures. These crunchy bites really elevate the festive experience and make each cookie extra special.
-
Spiced Delight: Incorporate a pinch of cinnamon or nutmeg into the dough to add warmth and spice. This subtle twist evokes cozy holiday memories and enhances the overall flavor profile beautifully.
-
Chocolate Drizzle: Drizzle melted white or dark chocolate over cooled cookies for an added touch of sweetness and elegance. It not only enhances the flavor but also makes these cookies visually stunning—perfect for impressing guests!
-
Sprinkled Joy: Top with colorful holiday-themed sprinkles before baking for a festive touch. The vibrant colors will catch your eye and make these treats feel even more celebratory.
-
Dairy-Free Option: Use coconut oil instead of butter, and almond milk instead of regular milk for a delicious dairy-free treat. Guests with dietary restrictions will appreciate this thoughtful adjustment, and you won’t lose any of that beloved flavor.
-
Fruity Finish: Add a few drops of raspberry or orange extract to the dough for a fruity twist that pairs beautifully with the chocolate. The zesty flavors will brighten up the cookies and take them to the next level of deliciousness!
-
Double Chocolate Twist: Swap half of the all-purpose flour for cocoa powder to create an even richer chocolate cookie. This variation turns the already irresistible Red Velvet Snowballs into a true chocolate lover’s dream!
For even more festive baking ideas, don’t forget to explore these delightful Spooky Black Velvet treats and 4-Ingredient Gluten Free delights.
Expert Tips for Red Velvet Snowballs
-
Use Softened Butter: Start with softened butter for easier blending. Cold butter can result in dense cookies, losing their lovely soft texture.
-
Gel Food Coloring: Opt for gel red food coloring for vibrant cookies. Liquid coloring can dilute the dough, leading to a less intense red hue.
-
Chill Dough if Sticky: If the dough feels sticky, refrigerate it for 20 minutes. This helps with shaping and prevents the cookies from spreading too much during baking.
-
Check Baking Time: Every oven is unique; keep an eye on the cookies. They should be set but soft in the center for that perfect texture in your Red Velvet Snowballs.
-
Double Roll in Sugar: For an extra snowy effect, roll the cookies in powdered sugar twice—once while they’re warm and again after they cool completely.
-
Experiment with Fillings: Get creative! Try adding cream cheese or flavored chocolate fillings for a flavorful twist.
What to Serve with Red Velvet Snowballs
Elevate your holiday gatherings by complementing these delightful cookies with an array of tasty treats.
- Hot Cocoa: This warm, chocolatey drink is the perfect cozy companion, enhancing the rich flavors of the snowballs.
- Festive Fruit Platter: A colorful assortment of seasonal fruits adds freshness and balances the sweetness of the cookies.
- Cream Cheese Frosting: A dollop of this tangy frosting mirrors the creamy texture of the cookies and amplifies their indulgence.
Serve your cookies with something refreshing. Consider a sparkling water or festive punch to cleanse the palate, providing a contrast to the rich, velvety sweetness.
- Peppermint Bark: The minty crunch of this treat pairs beautifully with the cookies’ textures, creating a delightful holiday experience.
- Pecan Pie Bars: Their buttery, nutty flavor complements the red velvet’s sweetness, satisfying dessert lovers at your gathering.
- Spiced Chai Latte: This aromatic drink warms the soul and complements the cocoa flavor, enhancing every bite of the rich, velvety cookies.
- Vanilla Ice Cream: A scoop of creamy vanilla ice cream brings a delightful contrast and adds to the festive cheer of your dessert spread.
- Christmas Sugar Cookies: A classic holiday favorite that allows guests to experience various textures and flavors on the tasting table.

Red Velvet Snowballs Recipe FAQs
What type of red food coloring should I use?
I recommend using gel food coloring for Red Velvet Snowballs. Gel coloring provides a vibrant and deep hue that won’t alter the dough’s consistency, unlike liquid food coloring, which can dilute the mixture and lead to a lighter color.
How should I store the Red Velvet Snowballs?
Store the cookies in an airtight container at room temperature for up to 5 days. They maintain their soft and chewy texture, making them the perfect treat for holiday snacking. If you’d prefer a firmer texture, feel free to refrigerate them for about a week.
Can I freeze unbaked Red Velvet Snowballs?
Absolutely! To freeze unbaked dough balls, shape the dough into 1-inch balls and place them on a baking sheet lined with parchment paper. Freeze until solid, then transfer them to a freezer-safe bag or container. They can be frozen for up to 3 months. When ready to bake, thaw in the fridge overnight, and bake as directed, rolling in powdered sugar after.
What can I do if my dough is too sticky?
If your dough feels sticky and difficult to handle, don’t worry! Simply refrigerate it for about 20 minutes. This cooling will help firm it up, making it easier to roll into balls and preventing the cookies from spreading too much during baking.
Are there any allergy considerations I should be aware of?
Yes, if you’re serving these Red Velvet Snowballs to guests with allergies, keep in mind the ingredients. These cookies contain dairy (butter) and gluten (all-purpose flour). To cater to specific dietary needs, consider using gluten-free flour blends and dairy-free butter substitutes.
Can I add different fillings to the cookies?
The more the merrier! You can certainly experiment with fillings. Before shaping and baking your dough, create a small indent in each dough ball and add a teaspoon of cream cheese, Nutella, or melted chocolate. This delightful surprise will elevate your Red Velvet Snowballs to a whole new level of deliciousness!
Red Velvet Snowballs: Delightful Holiday Bites of Joy
Ingredients
Equipment
Method
- Cream together the butter and sugar until light and fluffy, then mix in the vanilla and red food coloring.
- In another bowl, whisk together the flour, cocoa powder, baking powder, and salt.
- Gradually add the dry ingredients to the creamed mixture, mixing until a cohesive dough forms.
- Preheat oven to 350°F and roll dough into 1-inch balls, placing them on a baking sheet.
- Bake for 10-12 minutes until set but soft in the center.
- Cool on the baking sheet, then roll in powdered sugar before cooling completely.
Leave a Reply