
As I stood by the stove, the sizzle of shrimp filling the air drew me back to balmy evenings spent in bustling coastal markets. That’s when I fell in love with making crispy Shrimp Balls—an easy yet impressive seafood delight that’s perfect for any occasion. Whether you’re hosting a game night or simply craving something delicious, these versatile bites are sure to please. Thanks to their quick prep and customizable flavors, you can whip up a batch for delightful appetizers, snacks, or even a main dish. The best part? You can easily tweak the recipe to fit your taste preferences or pantry staples! Curious about how to bring a taste of the coast to your kitchen? Let’s dive into this flavorful adventure together!

Why Are Shrimp Balls So Irresistible?
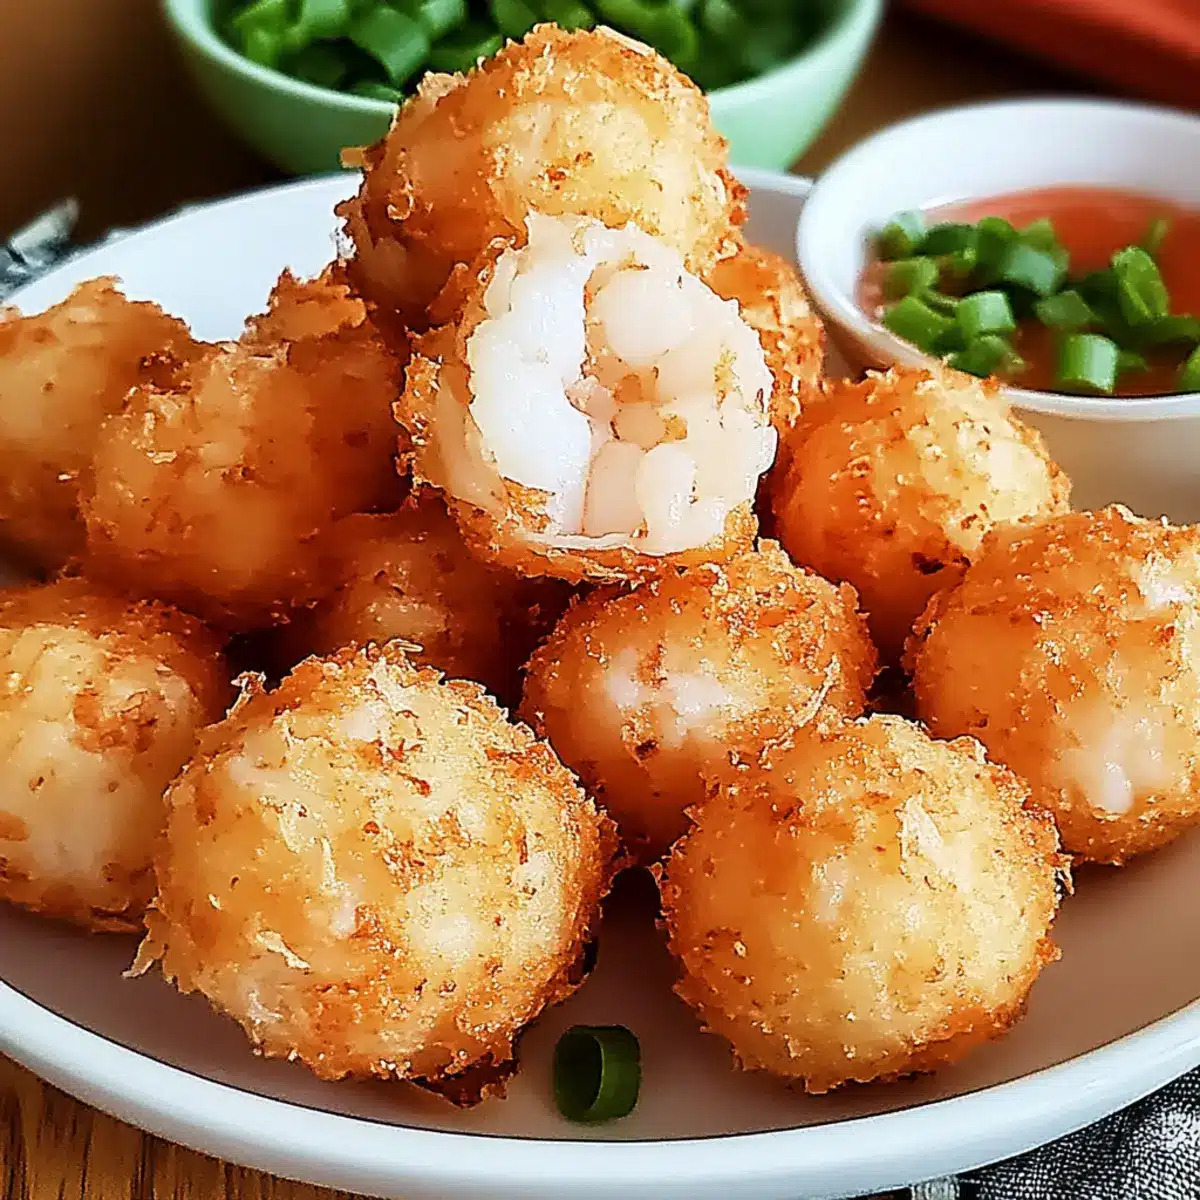
Crispy, golden exterior: The satisfying crunch on the outside gives way to a juicy, tender shrimp filling that’s packed with flavor.
Endless customization: Feel free to mix and match your favorite herbs or even toss in some veggies for added crunch—every batch can be uniquely yours!
Quick and easy: With minimal prep time, these Shrimp Balls come together in a flash—perfect for spontaneous get-togethers or late-night cravings.
Crowd-pleaser: Whether as an appetizer or a main dish, these bites are sure to impress guests and family alike, making your kitchen the star of any gathering.
Looking for more seafood inspiration? Check out these delicious Keto Garlic Shrimp or indulge in a savory plate of Baked Meatballs Savory.
Shrimp Balls Ingredients
• To create these delightful shrimp balls, you’ll need a few simple ingredients.
For the Shrimp Balls
- Shrimp – Fresh or frozen, peeled shrimp works best for that sweet and tender texture.
- Seasonings – Add your favorite herbs or spices to elevate the flavor; a pinch of garlic powder can work wonders!
- Cream Cheese (optional) – For extra richness; you can substitute with sour cream for a lighter option.
- Breadcrumbs – Provides the perfect crispy coating; gluten-free breadcrumbs are a great alternative for those avoiding gluten.
- Egg (optional) – Acts as a binder; a flax egg can replace it for a vegan-friendly option.
Feel free to get creative with these ingredients, as the possibilities for scrumptious shrimp balls are endless!
Step‑by‑Step Instructions for Shrimp Balls
Step 1: Prepare Shrimp
Start by cleaning and peeling the shrimp thoroughly, removing any shells or tails. Then, chop the shrimp into small, bite-sized pieces, aiming for a chunky texture that allows bursts of flavor in each Shrimp Ball. Set aside the prepared shrimp in a mixing bowl.
Step 2: Mix Ingredients
In the bowl with the chopped shrimp, add your favorite seasonings, a splash of creativity with herbs, and cream cheese if desired. Stir in breadcrumbs, ensuring an even distribution of all ingredients. Mix until well combined, creating a cohesive mixture that will form the base of your savory Shrimp Balls.
Step 3: Form Balls
With your hands, scoop out a small portion of the mixture and gently roll it into a ball about the size of a golf ball. Repeat this process until the mixture is fully shaped into uniform balls, placing them on a clean plate. These Shrimp Balls should be compact enough to hold their shape during cooking.
Step 4: Heat Oil
In a large frying pan, pour enough oil to cover the bottom and heat over medium-high heat until it reaches around 350°F (175°C). A good test is to drop a small piece of shrimp mixture in; it should sizzle immediately. Ensure the oil is hot but not smoking to avoid burning.
Step 5: Fry
Carefully add the Shrimp Balls in batches to the hot oil, making sure not to overcrowd the pan. Fry for about 3-5 minutes on each side, or until they turn a beautiful golden brown and are cooked through. Keep an eye on them, turning as needed for even browning.
Step 6: Drain
Once golden and crispy, remove the Shrimp Balls from the oil using a slotted spoon. Place them on a plate lined with paper towels to drain excess oil. This last step ensures you retain that delightful crunch for every bite of your delicious Shrimp Balls.

Expert Tips for the Best Shrimp Balls
- Oil Temperature: Make sure the oil is hot enough for a crispy texture. Test with a small piece before frying the entire batch to avoid sogginess.
- Don’t Overcrowd: Fry Shrimp Balls in batches; overcrowding can lower oil temperature and result in uneven cooking.
- Herb Power: Adding fresh herbs like cilantro or parsley enhances flavor significantly—don’t skip this step for maximum deliciousness!
- Crispy Coating: Use a mix of panko and regular breadcrumbs for an extra crunch; adjust according to your preference for a delightful exterior.
- Flavor Variations: Get creative with seasonings! Try adding Old Bay seasoning or lime zest for a zesty twist on your Shrimp Balls.
Make Ahead Options
These crispy Shrimp Balls are perfect for meal prep enthusiasts! You can prepare the shrimp mixture up to 24 hours in advance by following the first three steps: clean, chop, and mix your shrimp, seasonings, and breadcrumbs. Once combined, cover the bowl tightly with plastic wrap and refrigerate to keep the flavors fresh and prevent browning. When you’re ready to fry, simply form the mixture into balls and heat the oil according to the instructions. This way, not only do you save time on busy weeknights, but when you’re ready to serve, you’ll enjoy restaurant-quality shrimp balls, just as delicious as when freshly made!
Storage Tips for Shrimp Balls
Fridge: Store leftover Shrimp Balls in an airtight container for up to 2 days to maintain freshness.
Freezer: For longer storage, freeze the uncooked Shrimp Balls on a baking sheet before transferring them to a freezer bag. They can last up to 3 months.
Reheating: To enjoy your Shrimp Balls again, reheat in the oven at 350°F (175°C) for about 10-15 minutes to retain that crispy texture without frying again.
Serving Tip: Pair reheated Shrimp Balls with your favorite dipping sauces for a delightful snack or appetizer!
What to Serve with Crispy Shrimp Balls?
Transform your delightful shrimp balls into a complete meal with these fantastic accompaniments that will elevate your dining experience.
-
Tangy Dipping Sauce: A zesty sauce, like spicy mayo or sweet chili, adds a vibrant kick that beautifully complements the shrimp’s flavor.
-
Crispy Coleslaw: A fresh, crunchy coleslaw brings a cool contrast to the warm shrimp balls, enhancing each bite with crunchy textures. The dressing can be adjusted to suit your taste—think creamy or vinaigrette!
-
Light Citrus Salad: A salad with arugula, orange segments, and a simple lemon vinaigrette brightens the plate and adds refreshing notes that balance the richness of the shrimp.
-
Garlic Bread: Serve alongside warm, buttery garlic bread for that extra comfort factor. The crispy edges and soft inside make a perfect dipping companion!
-
Fluffy Coconut Rice: This subtly sweet and fluffy rice provides a delicious base that pairs beautifully with the savory flavors of the shrimp balls, turning them into a delightful main dish.
-
Craft Beer: Enjoy a local craft beer to accompany your shrimp balls—a hoppy IPA or crisp lager will enhance the overall experience and refresh your palate between bites!
Shrimp Balls: Customize for Flavor
Discover how easy it is to personalize these savory bites with delightful twists that will get your taste buds dancing!
- Seafood Twist: Substitute shrimp with crab or a seafood mix for a different ocean-inspired flavor.
- Veggie Boost: Add diced bell peppers or minced onions to the mixture for a fresh crunch and vibrant color.
- Spice It Up: Mix in chopped jalapeños or a pinch of cayenne pepper to give your Shrimp Balls a kick of heat.
- Herb-Infused: Experiment with fresh herbs like dill, basil, or cilantro for a burst of aroma and taste.
- Dipping Sauces: Serve with sweet chili sauce, spicy mayo, or tangy aioli for extra flavor; each dip complements the crispy texture beautifully.
If you love variety, try pairing with these delicious Baked Chicken Meatballs for another snack option, or enjoy a light lunch with Crab Shrimp Stuffed dishes!
- Cheese Lover’s Choice: Incorporate shredded cheese like cheddar or pepper jack into the mixture for cheesy goodness in every bite.
- Gluten-Free: Use gluten-free breadcrumbs to ensure everyone can enjoy these tasty morsels without worry.
Feel free to adapt and mix for a fun cooking adventure that reflects your unique taste!

Shrimp Balls Recipe FAQs
How do I choose the best shrimp for my Shrimp Balls?
Absolutely! If you’re using fresh shrimp, look for those that are firm with a slight sea-sweet scent, avoiding any that have dark spots all over as they might be past their prime. For frozen shrimp, opt for those that are peeled and deveined to save time; just ensure they’re fully thawed before you chop them up for your recipe.
How should I store leftover Shrimp Balls?
Very! Store leftover Shrimp Balls in an airtight container in the fridge. They’ll stay fresh for up to 2 days. When you’re ready to enjoy them again, simply reheat in the oven at 350°F (175°C) for about 10-15 minutes to restore their delightful crunch.
Can I freeze Shrimp Balls for later use?
Absolutely! To freeze, first shape your uncooked Shrimp Balls and arrange them on a baking sheet in a single layer. Place the sheet in the freezer for about 2 hours or until solid, then transfer them to a freezer bag. They can be stored in the freezer for up to 3 months. When ready to fry, no need to thaw; just drop them into hot oil straight from the freezer, adding a couple of extra minutes to the cooking time.
What should I do if my Shrimp Balls fall apart while frying?
Don’t worry! If your Shrimp Balls are falling apart, it might be due to insufficient binding agents like eggs or cream cheese. If this happens, try mixing in a bit more of these ingredients and give them a gentle squeeze to help retain their shape. Also, ensure your oil is hot enough; a too-cool temperature can cause them to break apart as well.
Are Shrimp Balls suitable for people with allergies?
Great question! Since Shrimp Balls contain seafood, they’re not suitable for those with shellfish allergies. For dietary considerations, if you’re aiming for gluten-free options, simply substitute the breadcrumbs for gluten-free varieties, and if you’re vegan, consider using flax eggs and omitting the cream cheese. Always double-check ingredient labels to ensure safety for allergies.
What dipping sauces work best with Shrimp Balls?
Absolutely scrumptious! Dipping sauces elevate your Shrimp Balls to the next level. Consider serving them with a spicy mayo, tangy sweet chili sauce, or a zesty garlic aioli. If you’re feeling adventurous, mix up your own concoction using yogurt with a squeeze of lemon and herbs for a refreshing twist!
Savory Shrimp Balls: Crispy, Flavorful Bites for Any Snack
Ingredients
Equipment
Method
- Clean and peel the shrimp thoroughly, removing any shells or tails, then chop into small, bite-sized pieces.
- In a bowl, combine the chopped shrimp with your favorite seasonings, cream cheese, and breadcrumbs, mixing until well combined.
- Form the mixture into balls about the size of a golf ball and place them on a clean plate.
- Heat oil in a large frying pan over medium-high heat until it reaches around 350°F (175°C).
- Fry the Shrimp Balls in batches for about 3-5 minutes on each side until golden brown.
- Remove the Shrimp Balls from the oil and drain excess oil on paper towels.
Leave a Reply