
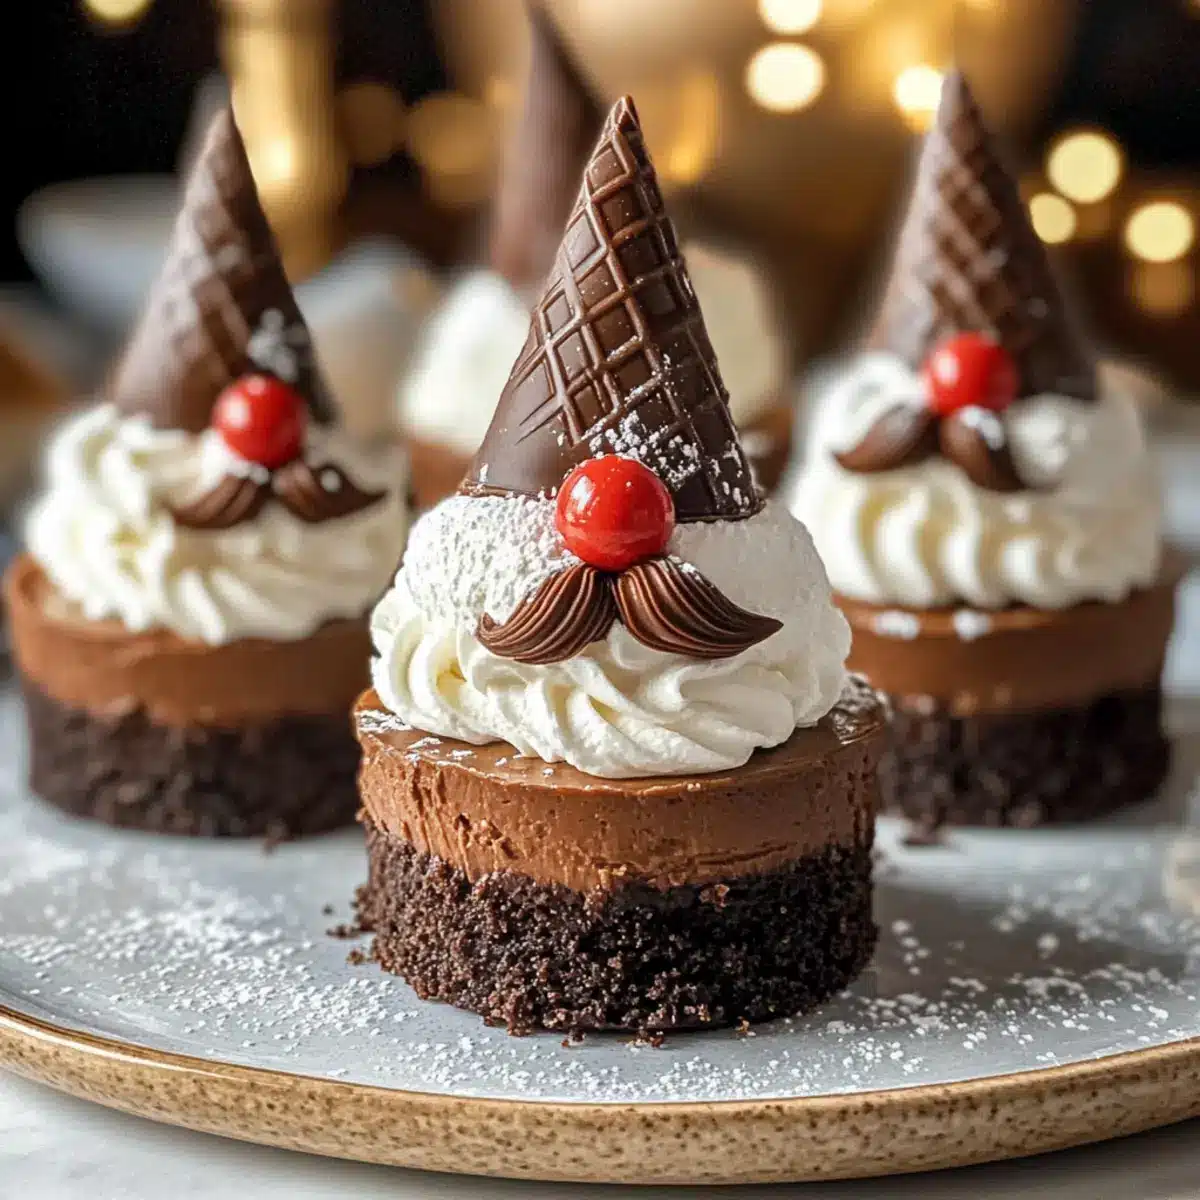
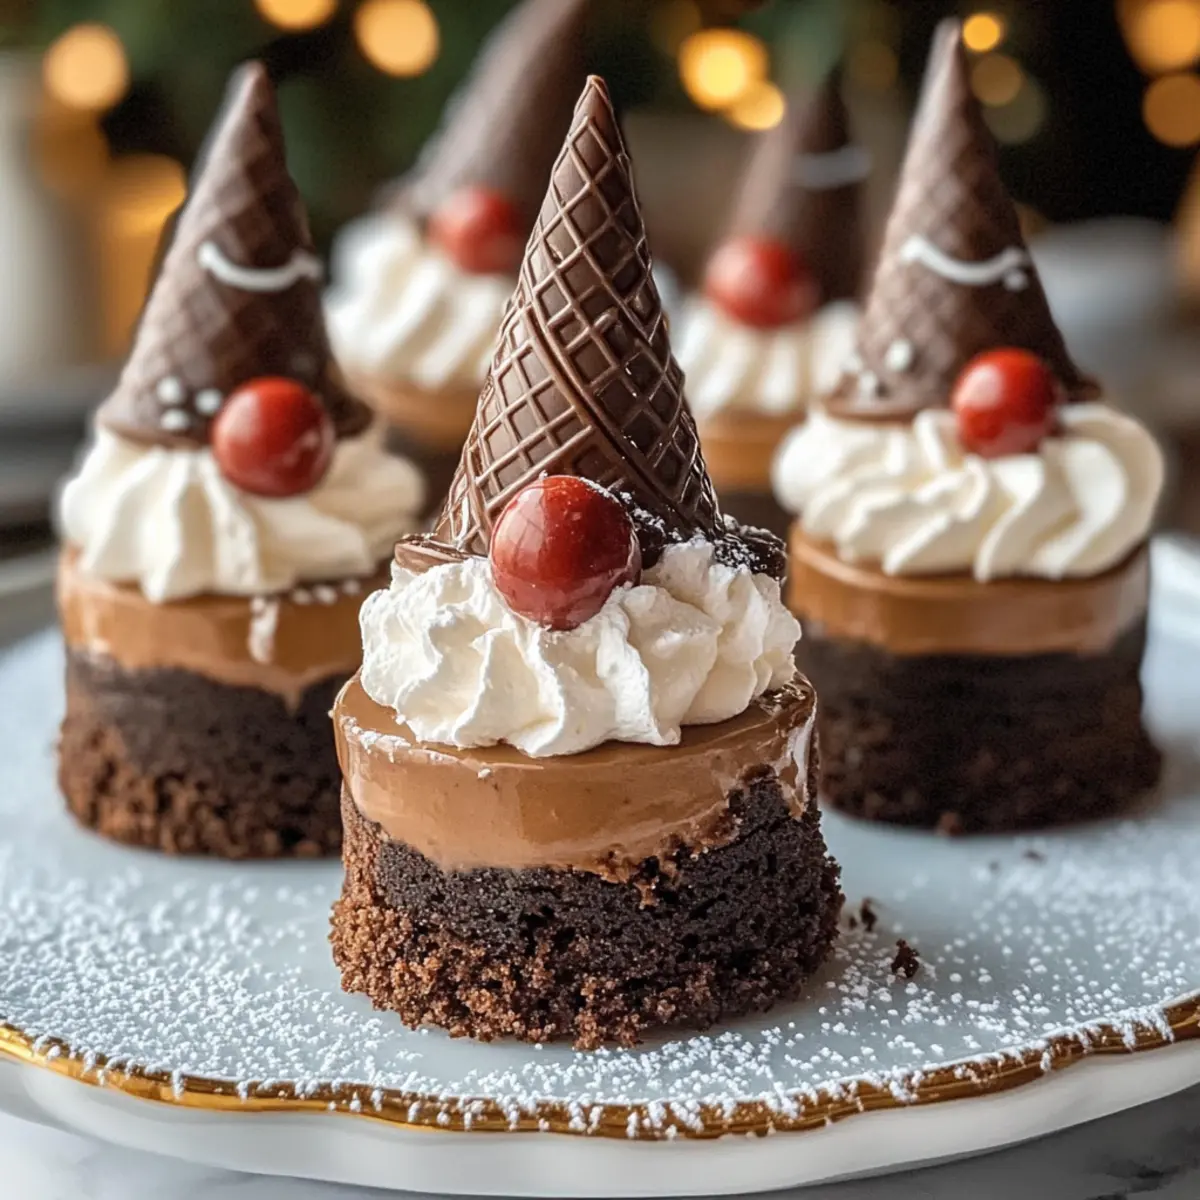
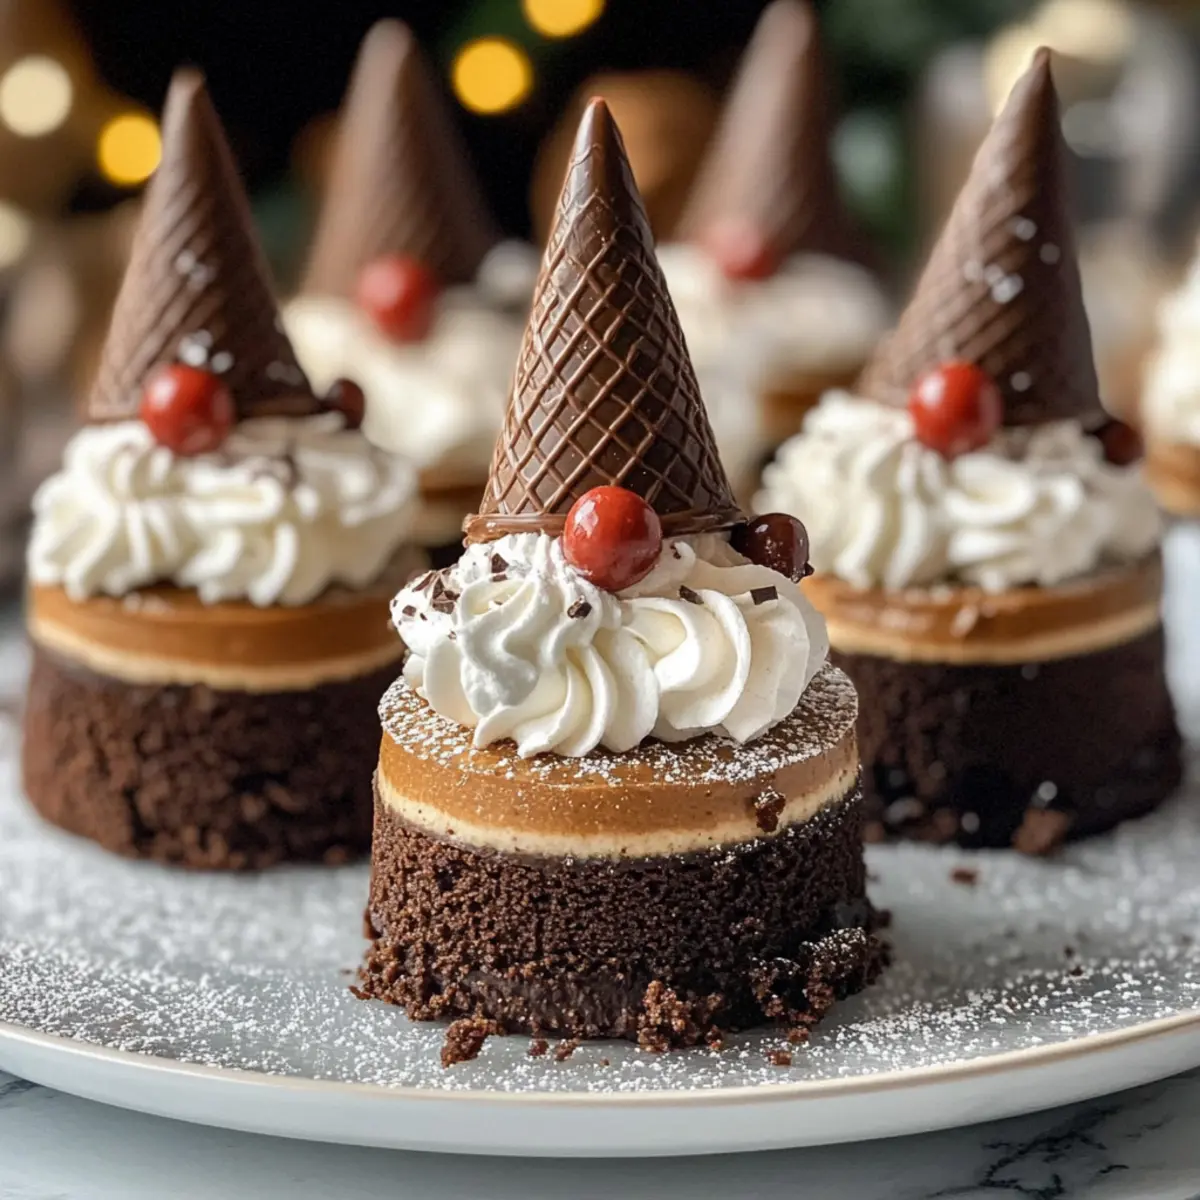
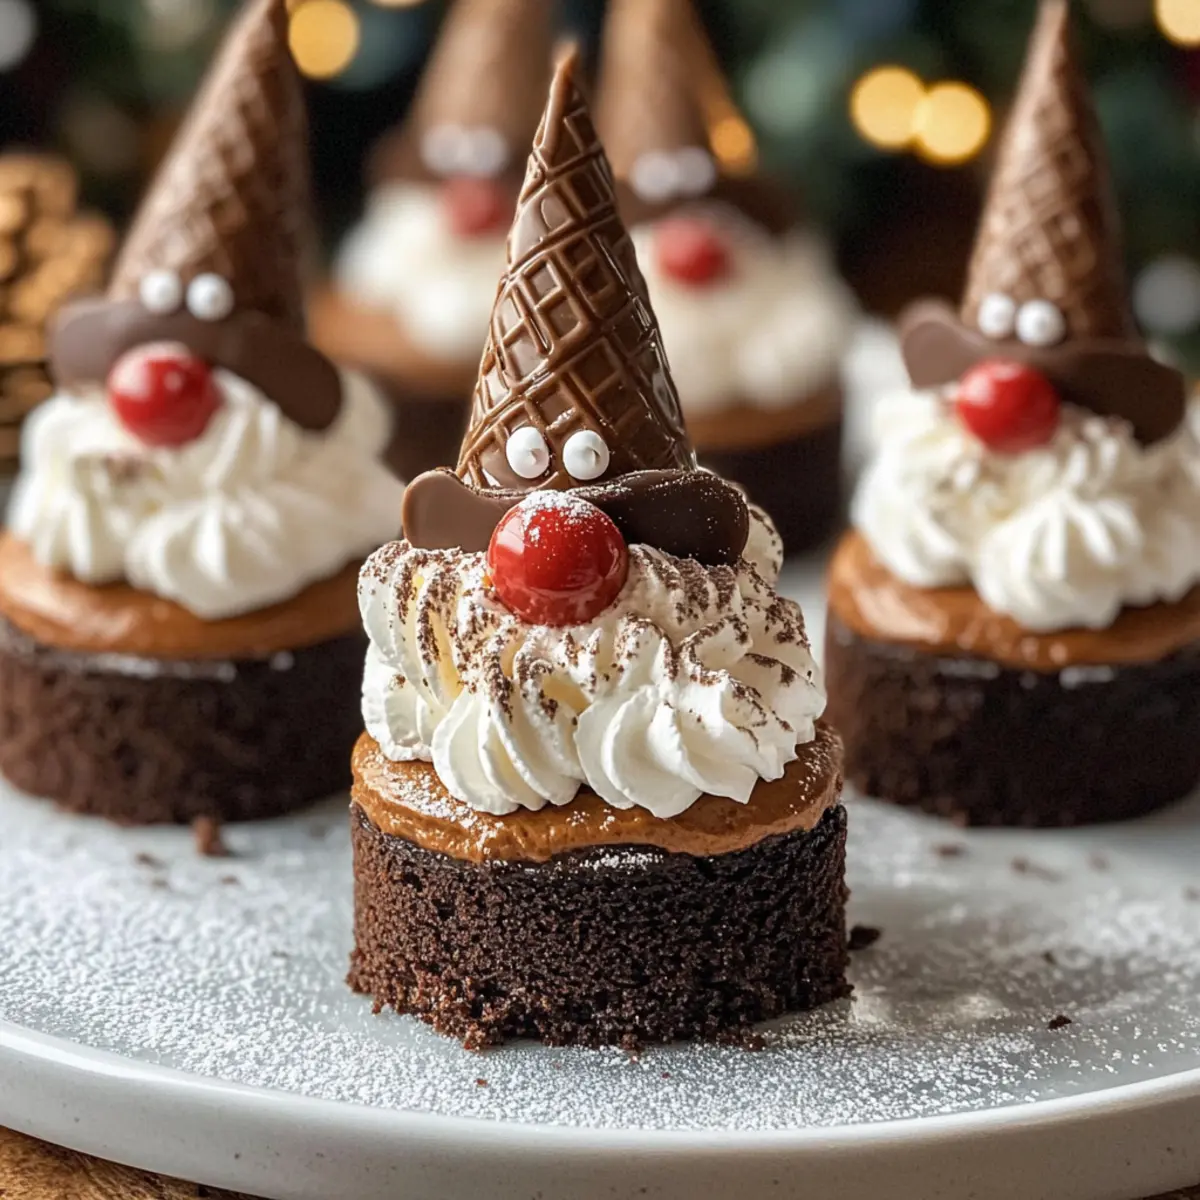
Amid the bustling joy of the holiday season, I found myself at a crossroads, debating whether to stick to conventional desserts or embrace a little whimsy. Enter the Chocolate Gnome Cheesecakes—a festive twist that satisfies both my love for chocolate and my desire to create something memorable. These charming mini cheesecakes, with their velvety texture and rich cocoa flavor, are not just a treat for the taste buds; they’re a delightful edible art, perfect for any holiday gathering. The best part? They come together quickly, making them a fantastic option for last-minute gatherings, yet they also provide a canvas for your creativity with customizable decorations. So, are you ready to whip up some holiday magic with me?
Why Are Chocolate Gnome Cheesecakes So Special?
Whimsical, these mini cheesecakes turn desserts into festive masterpieces that elevate any gathering. Customizable decorations let your creativity shine, allowing you to personalize each gnome for a unique touch. Quick to prepare, they’re perfect for last-minute celebrations and will impress friends and family alike. Decadent chocolate flavor paired with a creamy texture offers indulgence in every bite, reminiscent of festive joy. Pair these with other sweet treats from my collection, like Vegan Chocolate Mousse or White Chocolate Raspberry Dream Cake, to create a delicious dessert spread that everyone will love!
Chocolate Gnome Cheesecakes Ingredients
For the Crust
• Chocolate Cookie Crumbs – Essential for the base of the crust; provides a rich chocolate flavor. Substitution: Graham cracker crumbs can be used for a different flavor.
• Melted Butter – Binds the crust components and adds richness. Ensure it cools slightly before mixing with crumbs.
For the Cheesecake Filling
• Cream Cheese – Gives the cheesecake its creamy texture and tangy flavor. Substitution: Use Neufchâtel for a lower-fat option.
• Granulated Sugar – Sweetens the cheesecake and helps create a light texture.
• Sour Cream/Greek Yogurt – Adds creaminess and a touch of tang. Substitution: Cream can be used for a richer taste.
• Vanilla Extract – Enhances overall flavor.
• Semi-Sweet Chocolate – Provides the primary chocolate flavor in the cheesecake. Substitution: Use dark chocolate for a deeper taste.
• Eggs – Acts as a binding agent, ensuring a set structure.
For the Decorations
• Whipped Cream – Used for gnome decorations, adds lightness and a fluffy texture. Tip: Use stabilized whipped cream for longevity during display.
• Candy-Coated Chocolates/White Chocolate Chips – Used as gnome noses, adds a playful touch.
• Optional Decorations – Mini strawberries or chocolate cones can embellish gnome hats.
Step‑by‑Step Instructions for Chocolate Gnome Cheesecakes
Step 1: Preheat the Oven and Prepare the Pan
Begin by preheating your oven to 325°F (160°C). While the oven heats up, line a muffin tin with paper liners to easily remove the cheesecakes later. This step is crucial for making your Chocolate Gnome Cheesecakes, ensuring they bake evenly and are easy to serve.
Step 2: Mix the Crust Ingredients
In a mixing bowl, combine chocolate cookie crumbs and melted butter until the mixture is crumbly. Use a fork to ensure everything is evenly distributed. This combination will create a rich, flavorful base for your cheesecakes that holds its shape beautifully once baked.
Step 3: Form the Crust
Take small amounts of the crumb mixture and press it into the bottom of each lined muffin cup. Aim for a firm and even layer, which will provide a solid foundation for your cheesecakes. Bake in the preheated oven for 5 minutes, then remove and allow them to cool completely.
Step 4: Prepare the Cheesecake Filling
In a large mixing bowl, beat the cream cheese with an electric mixer until smooth. Gradually add in granulated sugar, sour cream, and vanilla extract, mixing until the mixture is silky and creamy. This step is vital for achieving the luscious texture of your Chocolate Gnome Cheesecakes.
Step 5: Add Chocolate and Eggs
Melt the semi-sweet chocolate and let it cool slightly. Pour the melted chocolate into the cream cheese mixture and blend until combined. Then, add the eggs one at a time, mixing just until each egg is incorporated. Be careful not to overmix, as this can cause cracks in your cheesecakes.
Step 6: Fill the Crusts with Cheesecake Batter
Carefully pour the cheesecake filling into each cooled crust, filling them about three-quarters full. This will ensure they have room to rise without overflowing. Bake in the oven for 18-20 minutes, or until the cheesecakes are just set—lightly jiggly in the center and firm around the edges.
Step 7: Cool in the Oven
Once baked, turn off the oven and leave the cheesecakes inside with the door slightly ajar for 10 minutes. This gentle cooling method helps prevent cracks from forming in your Chocolate Gnome Cheesecakes. Afterward, transfer them to the refrigerator to chill for at least 2 hours or overnight.
Step 8: Decorate Your Cheesecakes
Once fully chilled, it’s time to decorate! Use ganache or whipped cream to create the gnomes’ hats and beards. Attach candy-coated chocolates for noses and any other fun decorations you desire. Don’t forget to sprinkle with powdered sugar for a festive touch that brings your Chocolate Gnome Cheesecakes to life!
Tips for the Best Chocolate Gnome Cheesecakes
-
Avoid Overmixing: Keep it gentle when adding eggs; overmixing can lead to cracks in your delicious cheesecakes.
-
Perfect Ganache: Ensure cream is hot enough to melt the chocolate thoroughly for a smooth ganache topping.
-
Cool Gradually: Let cheesecakes cool in the oven with the door ajar to prevent sudden temperature changes, which can crack your cheesecakes.
-
Use Stabilized Whipped Cream: For decorations that hold up during gatherings, stabilize your whipped cream—this keeps it fluffy and beautiful longer.
-
Customize Decorations: Get creative! Use candy-coated chocolates or fresh fruits to make your Chocolate Gnome Cheesecakes uniquely festive.
-
Chilling Time: Don’t rush the cooling process; allowing them to chill adequately enhances the texture and flavor of your cheesecakes.
What to Serve with Chocolate Gnome Cheesecakes
As you prepare to dazzle your friends and family with these delightful mini treats, consider these perfect pairings to create a complete holiday feast.
-
Festive Fruit Salad: A refreshing medley of seasonal fruits provides a light, fruity contrast to the rich cheesecakes, balancing flavors beautifully. Include pomegranate seeds for a pop of color and holiday cheer!
-
Rich Hot Chocolate: Cozy up with a warm cup of velvety hot chocolate. Its creamy, chocolatey goodness complements the cheesecakes perfectly, making each bite a harmonious indulgence.
-
Peppermint Bark: This crunchy, sweet treat adds a delightful minty twist and festive crunch, enhancing the gnome theme while offering a fun texture for your dessert spread.
-
Spiced Chai Latte: The warm spices of a chai latte create a comforting backdrop for your chocolate desserts, amplifying the holiday ambiance with each sip.
-
Whipped Cream Topping: A dollop of lightly sweetened whipped cream can elevate your cheesecakes, adding a luscious texture that echoes their creamy filling. It’s an essential component for a truly indulgent experience!
-
Chocolate-Dipped Strawberries: These bite-sized delights provide a fun, fresh element alongside your cheesecakes, mixing the pleasures of chocolate and fruit in one beautiful presentation.
-
Christmas Cookies: A plate of assorted festive cookies makes for a wonderful nibble alongside your Chocolate Gnome Cheesecakes, offering variety for guests to enjoy. Think gingerbread or sugar cookies with decorative icing for a seasonal touch.
-
Mulled Wine: Warm up your holiday gathering with a glass of spiced mulled wine, swirling in rich flavors that work wonderfully with the sweetness of your desserts.
-
Vanilla Ice Cream: The creaminess of vanilla ice cream alongside the cheesecakes offers a nostalgic touch, enhancing the overall dessert experience and adding a cool contrast to the rich flavors.
How to Store and Freeze Chocolate Gnome Cheesecakes
Fridge: Store your Chocolate Gnome Cheesecakes in an airtight container for up to 4 days. This keeps them fresh and creamy, perfect for snacks or dessert throughout the week.
Make-Ahead: You can prepare the cheesecakes up to 2 days in advance and store them in the fridge. Decorate just before serving for the best presentation and freshness.
Freezer: For longer storage, freeze the undecorated cheesecakes for up to 1 month. Thaw in the fridge overnight before adding your charming decorations.
Reheating: These desserts are best enjoyed chilled; simply serve directly from the fridge for the ultimate taste experience.
Chocolate Gnome Cheesecakes Variations
Feel free to let your imagination run wild as you customize your Chocolate Gnome Cheesecakes with these delightful twists!
-
Dark Chocolate: Swap semi-sweet chocolate for dark chocolate to deepen the cocoa flavor and add a hint of sophistication.
-
Graham Cracker Crust: For a twist, use graham cracker crumbs instead of chocolate cookie crumbs for a delightful contrast in flavor.
-
Pistachio Crust: Replace traditional crust with crushed pistachios for a nutty crunch that pairs beautifully with chocolate.
-
Fruity Gnomes: Enhance the festive spirit by adding mini strawberries or even raspberries on top of your gnomes for a fun, fruity twist.
-
Mini Gnome Hats: Use ice cream cones as gnome hats adorned with festive sprinkles; they add a whimsical touch to your decorations.
-
Holiday Themes: Customize decorations for various holidays—think bunnies for Easter gnomes or spooky characters for Halloween, creating year-round charm.
-
Spiced Cream Cheese: Add a pinch of cinnamon or nutmeg to your cream cheese filling for a warm spiced flavor that evokes cozy holiday memories.
-
Opt for Greek Yogurt: For a healthier version, substitute sour cream with Greek yogurt to lighten up the cheesecakes while still keeping them creamy and tangy.
Feel free to pair these delightful cheesecakes with other treats like my High Protein Chocolate Chia Pudding for an extra indulgent spread, or try serving them alongside festive delights like Gluten Free Chocolate Cookies for a variety!
Make Ahead Options
These delightful Chocolate Gnome Cheesecakes are perfect for meal prep during the busy holiday season! You can prepare the cheesecakes themselves up to 2 days in advance, allowing you to save time on the day of your gathering. Simply follow the recipe up to the chilling step, then refrigerate them uncovered for the first hour to prevent condensation, and cover with plastic wrap afterward. For the best presentation, wait to decorate them until the day you plan to serve. Just before serving, whip up your stabilized cream and arrange your gnome features; they’ll be just as delicious and charming as if made fresh on the day!
Chocolate Gnome Cheesecakes Recipe FAQs
What type of chocolate cookies should I use for the crust?
Absolutely! For the perfect crust, I recommend using chocolate cookie crumbs as they provide a rich, chocolatey base. If you’re in a pinch or prefer a different flavor, graham cracker crumbs work wonderfully as a substitute. Just ensure to keep the ratio the same for a delicious result.
How long can I store my Chocolate Gnome Cheesecakes in the fridge?
Very! You can store your Chocolate Gnome Cheesecakes in an airtight container in the refrigerator for up to 4 days. This keeps their creamy texture intact, making them perfect for daily indulgence or surprise guests!
Can I freeze the cheesecakes, and how should I do it?
Absolutely! To freeze your Chocolate Gnome Cheesecakes, do so before adding decorations. Wrap each cheesecake tightly in plastic wrap and then place them in a freezer-safe container or bag, where they’ll keep for up to 1 month. When ready to enjoy, simply thaw them in the refrigerator overnight and add your creative touches just before serving.
What should I do if my cheesecake cracks?
Oh no! If your cheesecake cracks, don’t worry; it happens to the best of us! To prevent this in the first place, ensure you mix the eggs in gently, adding one at a time without overmixing. If you find cracks after baking, you can cover them up deliciously with whipped cream or ganache when decorating, turning your cheesecake into a charming gnome!
Are there any dietary concerns with this recipe?
Certainly! If you have allergies, be aware that this recipe contains dairy and eggs. For a lighter option, consider using Neufchâtel cheese instead of cream cheese and Greek yogurt instead of sour cream. These substitutes can reduce fat content while still providing a delightful texture! Always check labels for allergens, especially if you’re serving guests.
Can I customize the gnome decorations?
The more the merrier! Get creative with your Chocolate Gnome Cheesecakes by customizing decorations. You can play around with mini strawberries for hats or use colorful candies for features. This not only makes for a personalized dessert but allows your festive spirit to shine in every bite!
Charming Chocolate Gnome Cheesecakes for Festive Fun
Ingredients
Equipment
Method
- Preheat your oven to 325°F (160°C) and line a muffin tin with paper liners.
- In a mixing bowl, combine chocolate cookie crumbs and melted butter until crumbly.
- Press small amounts of the crumb mixture into the bottom of each muffin cup.
- Bake in the oven for 5 minutes and allow to cool completely.
- Beat cream cheese with an electric mixer until smooth; gradually add sugar, sour cream, and vanilla extract.
- Melt the semi-sweet chocolate and mix into the cream cheese mixture. Add eggs one at a time.
- Pour the cheesecake filling into each crust, filling about three-quarters full, and bake for 18-20 minutes.
- Turn off the oven and leave cheesecakes inside with the door slightly ajar for 10 minutes before chilling.
- Once chilled, decorate with whipped cream for gnome hats and noses, and sprinkle with powdered sugar.
Leave a Reply